micro-ROS OpenManipulator-X Demo
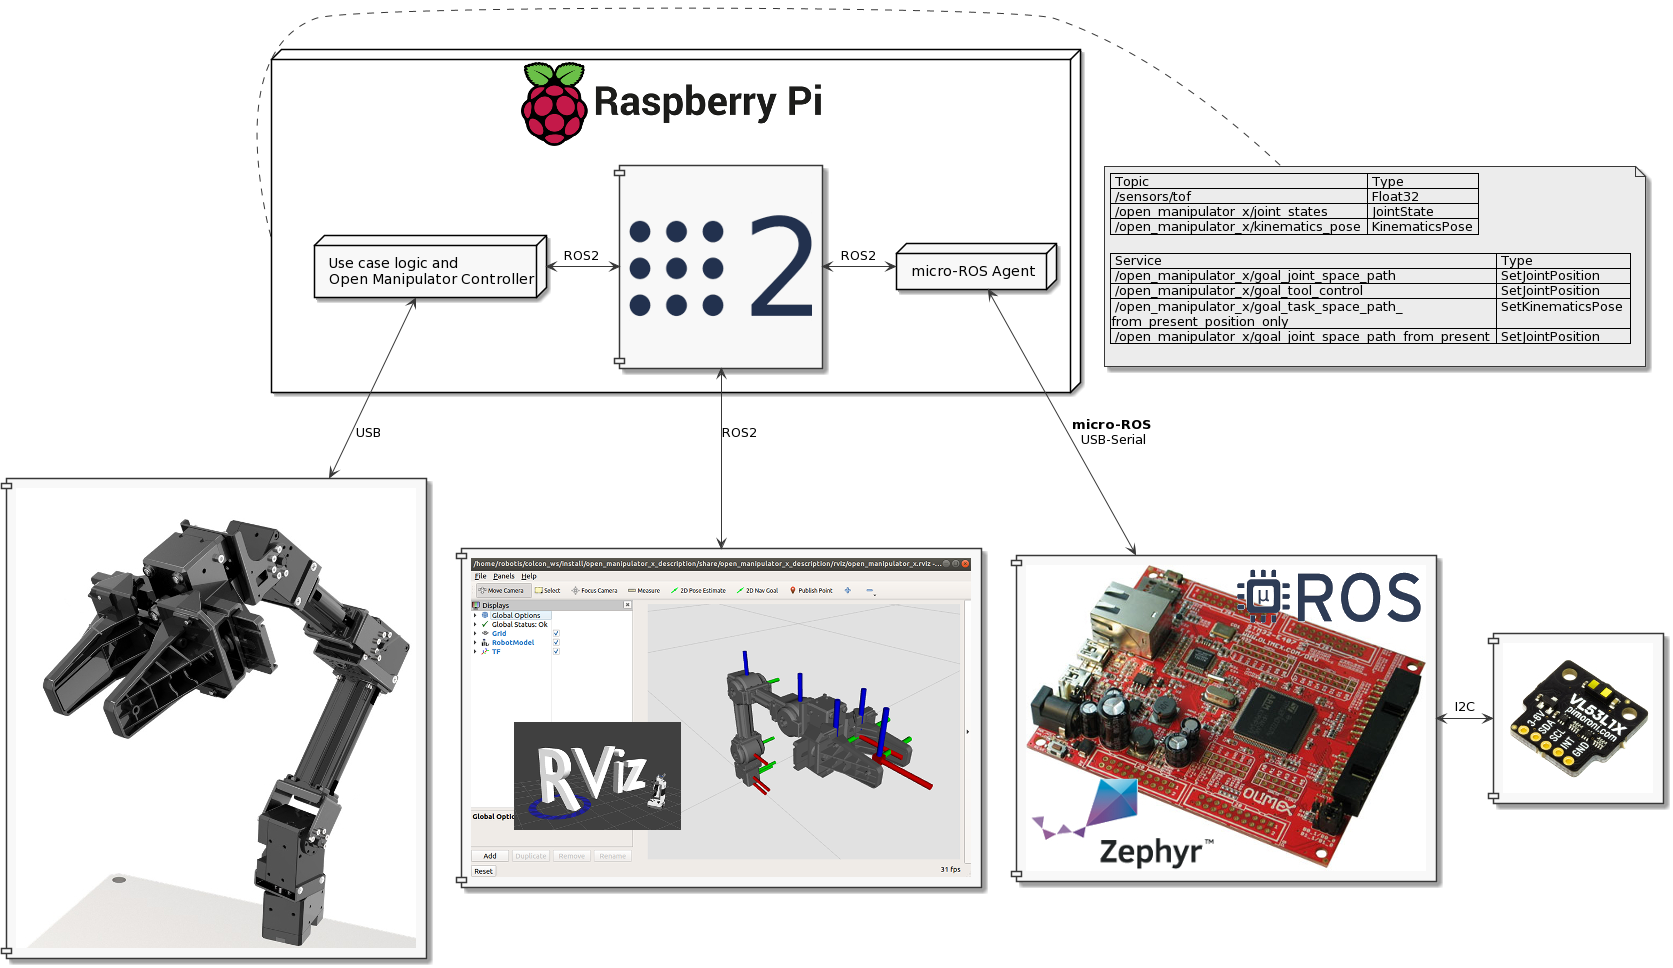
This demo illustrates micro-ROS capabilities in combination with the Robotis OpenMANIPULATOR-X, a ROS 2-enabled robotic arm and showcases the integration of micro-ROS with common ROS 2 tools such as RViz.
The use-case consists in a ROS 2-controlled robotic arm connected with a time of flight (ToF) sensor that measures the distance to a target object that will be grabbed by the arm. To achieve this scenario, complementing the Robotis OpenMANIPULATOR-X an ST VL53l1X ToF sensor will be assessing the distance between the base of the arm and the target object.
The ToF sensor is operated by an Olimex STM32-E407 development board. This board features an STM32F407 microcontroller unit able to run micro-ROS (more information can be found here). In order to get a ready-to-run micro-ROS enviroment, a Zephyr RTOS + micro-ROS port will be used.
The workflow of this use-case is as follows:
- The Zephyr + micro-ROS app running inside the Olimex STM32-E407 board will publish the ToF measure into the ROS 2
world, using the topic
/sensors/tof. This embedded application will have its micro-ROS Agent running in a Raspberry Pi board. - Some Robotis ROS 2 packages will be handling the kinematics of the robotic arm and listening to the controlling ROS 2 services defined here. For the sake of simplicity, these packages will run in the same Raspberry Pi board as the micro-ROS application.
- Another ROS 2 package (the one found in this repo) will be in charge of commanding the robotic arm based on the ToF measurements. The demo logic is contained in this package and it will drive the robotic arm towards the target object position and grab it when a steady position is detected.
As shown in the following diagram, one of the advantages of using micro-ROS as a ROS 2 complement is that tools such as RViz are enabled. In this case, an external computer can be used to check RViz visualizations of the complete system:
Hardware
The following is a list of the hardware needed to reproduce this demo:
- 1 x Robotis OpenMANIPULATOR-X
- 1 x Robotis OpenMANIPULATOR-X Power Supply
- 1 x Robotis U2D2
- 1 x Robotis U2D2 Power Hub
- 1 x Pimoroni VL53LX ToF sensor
- 1 x Raspberry Pi 4 + Power Supply + SD Card
- 1 x Olimex STM32-E407
- 1 x USB to microUSB cable
- 1 x USB to miniUSB cable
How to build the ROS 2 system
Instructions:
- Install an Ubuntu Server 18.04.4 64-bits for arm64 architectures in the SD card using Raspberry Pi Imager
- Once the SD card flashing is done, the WLAN password can be set in the file
boot/network-config -
Connect the Raspberry Pi to its power supply and use
sshto obtain a console. The initial user:password will beubuntu:ubuntubut you will be asked to modify it after the first login. - Install ROS 2 Dashing release:
sudo locale-gen en_US en_US.UTF-8
sudo update-locale LC_ALL=en_US.UTF-8 LANG=en_US.UTF-8
export LANG=en_US.UTF-8
sudo apt update && sudo apt install -y curl gnupg2 lsb-release
curl -s https://raw.githubusercontent.com/ros/rosdistro/master/ros.asc | sudo apt-key add -
sudo sh -c 'echo "deb [arch=amd64,arm64] http://packages.ros.org/ros2/ubuntu `lsb_release -cs` main" > /etc/apt/sources.list.d/ros2-latest.list'
sudo apt update && sudo apt install ros-dashing-ros-base
- Install the required Robotis ROS 2 controlling packages:
source /opt/ros/dashing/setup.bash
sudo apt install -y python3-argcomplete python3-colcon-common-extensions libboost-system-dev
mkdir -p ~/robotis_ws/src && cd ~/robotis_ws/src
git clone -b ros2 https://github.com/ROBOTIS-GIT/DynamixelSDK.git
git clone -b ros2 https://github.com/ROBOTIS-GIT/dynamixel-workbench.git
git clone -b ros2 https://github.com/ROBOTIS-GIT/open_manipulator.git
git clone -b ros2 https://github.com/ROBOTIS-GIT/open_manipulator_msgs.git
git clone -b ros2 https://github.com/ROBOTIS-GIT/open_manipulator_dependencies.git
git clone -b ros2 https://github.com/ROBOTIS-GIT/robotis_manipulator.git
git clone https://github.com/micro-ROS/micro-ROS_openmanipulator_demo
cd ~/robotis_ws/

# This may take a while
colcon build --symlink-install --parallel-workers 1
- Install a micro-ROS Agent:
source /opt/ros/dashing/setup.bash
sudo apt install -y python-rosdep2 python3-vcstool libncurses5-dev libcurl4-openssl-dev libasio-dev clang-tidy
mkdir ~/uros_ws && cd ~/uros_ws
git clone -b dashing https://github.com/micro-ROS/micro_ros_setup.git src/micro_ros_setup   #USE feature/agent_lite BRANCH
sudo rosdep init && rosdep update && rosdep install --from-path src --ignore-src -y
colcon build
source install/local_setup.bash
ros2 run micro_ros_setup create_agent_ws.sh   //GIVES ERROR BUT WORKS

# This may take a LONG while (1 hour aprox)
colcon build --meta src --parallel-workers 1
- Install some USB devices rules:
sudo cp ~/robotis_ws/src/open_manipulator/open_manipulator_x_controller/99-open-manipulator-cdc.rules /etc/udev/rules.d/
sudo udevadm control --reload-rules
sudo udevadm trigger
How to build the micro-ROS system
Using a computer workstation with a ROS 2 Dashing installation:
- Create a micro-ROS workspace and install
micro_ros_setuppackage:
source /opt/ros/$ROS_DISTRO/setup.bash
mkdir uros_ws && cd uros_ws
git clone -b $ROS_DISTRO https://github.com/micro-ROS/micro_ros_setup.git src/micro_ros_setup
rosdep update && rosdep install --from-path src --ignore-src -y
colcon build
source install/local_setup.bash
- Create a micro-ROS + Olimex STM32-E407 + Zephyr firmware:
ros2 run micro_ros_setup create_firmware_ws.sh zephyr olimex-stm32-e407
- Configure the firmware for using the
openmanipulator_tofpreinstalled app and for a Serial over USB transport
ros2 run micro_ros_setup configure_firmware.sh openmanipulator_tof --transport serial-usb
- Build the firmware:
ros2 run micro_ros_setup build_firmware.sh
- Flash the firmware. Detailed instructions on how to connect the board to flash the firmware can be found here:
ros2 run micro_ros_setup flash_firmware.sh
Running the use-case
- Connect the Raspberry Pi to Robotis U2D2. Make sure that this board is connected to Robotis U2D2 Power Hub, Robotis OpenMANIPULATOR-X Power Supply and Robotis OpenMANIPULATOR-X itself. Detailed instructions can be found here (TODO: image of this connection)
- Connect the Pimoroni VL53LX ToF sensor to the Olimex STM32-E407 board, and the Olimex board to the Raspberry Pi using a mini-USB OTG 2 connector.
- Inside a Raspberry Pi run these three commands in different command lines:
# First command line
cd ~/robotis_ws/
source /opt/ros/dashing/setup.bash
source install/local_setup.bash
ros2 launch open_manipulator_x_controller open_manipulator_x_controller.launch.py

# Second command line
cd ~/uros_ws/
source /opt/ros/dashing/setup.bash
source install/local_setup.bash
ros2 run micro_ros_agent micro_ros_agent serial --dev /dev/serial/by-id/usb-ZEPHYR_Zephyr_CDC_ACM_sample_3536510100290035-if00 -v6

# Third command line
cd ~/robotis_ws/
source /opt/ros/dashing/setup.bash
source install/local_setup.bash
ros2 run open_manipulator_x_tof open_manipulator_x_tof
- To visualize models on RViz run on a external computer step 5 of the
How to build the ROS 2 systemsection and then execute:
cd ~/robotis_ws/
source /opt/ros/dashing/setup.bash
source install/local_setup.bash
ros2 launch open_manipulator_x_tof open_manipulator_x_tof_rviz.launch.py
Purpose of the Project
This software is not ready for production use. It has neither been developed nor tested for a specific use case. However, the license conditions of the applicable Open Source licenses allow you to adapt the software to your needs. Before using it in a safety relevant setting, make sure that the software fulfills your requirements and adjust it according to any applicable safety standards, e.g., ISO 26262.
License
This repository is open-sourced under the Apache-2.0 license. See the LICENSE. file for details.
For a list of other open-source components included in this repository, see the file 3rd-party-licenses.txt.
Known Issues/Limitations
There are no known limitations.